Configuration of initial permissions (Must know)
We'll cover the initial permission configuration required and the steps to get you through configuring these for Team Foundation Server Extensions for Project Server in this recipe. These are not all the permissions in setting the complete system up, but just the ones required to begin configuration. It is possible that in a large enterprise installation, you will need to separate the requests to get them set by several individuals. This should help with facilitating that.
Getting ready
In the previous recipe we installed the integration. Now we'll build off of that as we configure the integration. Please take a moment to review the work we've done previously before we begin.
Also, it might be handy at this point to review the summary for steps we will be following in this recipe and in other recipes:
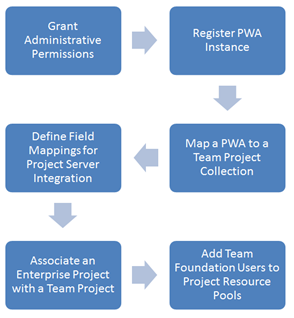
Entire configuration workflow
To initially configure the permissions required, you will need to assign administrative permissions of Team Foundation Server and an instance of Project Web App (PWA) to a user who will be responsible for the configuration of these products. You will use the Team Foundation Server Administration Console page for most of the Team Foundation Server permissions, and the Project Security dialog box or Manage Users / Manage Groups web pages for PWA. Please note these are the minimum configurations you'll need to perform for permissions, your installation may need more depending on your specific site requirements.
How to do it...
We'll lay the steps out in the following section by subject to make it easy to follow and refer back to later.
Firstly, we will be setting initial permissions.
You should perform the following modifications in given order:
-
Adding user to Team Foundation Administrators group:
Account(s): This is the account(s) that will be used to configure the integration of the Team Foundation Server. If this is the same user who installed Team Foundation Server, then this task would already be done during that product's installation and configuration.
- Open the Team Foundation Server Administration Console page from the Start menu of the Team Foundation Server.
- Navigate to the Group Membership dialog (Team Foundation Server Administration Console | Application Tier | Group Membership) to add this account to the Team Foundation Administrators group.
This user will be using the command-line tool TFSAdmin, this will be installed by Visual Studio 2012 during its installation.
-
Setting the Administer Project Server integration permission to Allow the account:
Account(s): These are the accounts of the project managers or other users who will manage the mapping of enterprise projects.
- Open the Team Foundation Server Administration Console page from the Start menu of the Team Foundation Server.
- Navigate to Team Foundation Server Administration Console | Team Project Collections | Administer Security dialog box to add the account to set the Administer Project Server permission to allow the user or group.
This is a project collection level permission.
-
Granting the Manage Security global permission to each instance of PWA that you will register with Team Foundation Server:
Account(s): This is the account(s) of user who will configure the integration of Team Foundation Server and Project Server or the one who registers the instances of PWA with Team Foundation Server service account for Team Foundation Server.
- Open the PWA Site in Internet Explorer at http://tfspsdemo/PWA/default.aspx.
- Navigate to Project Web App | Edit User | Selected User | Global Permissions Section | Manage Security.
Every service account for Project Server and SharePoint Products must be granted interactive logon permissions for the computer on which the service is running. This is not a usual permission for services so it bears special mentioning. You will need to repeat this on every PWA instance.
-
Granting Full Control permissions to invoke the Project Server Service Application:
Account(s): This is the service account for Team Foundation Server.
We will use SharePoint Central Administration using the following steps:
- Run the SharePoint Central Administration page from the Start menu.
- In the Application Management section, click on the Manage Service Applications option (many service applications will be listed here normally).
- From the Manage Service Applications page, select the row for Project Server Service Application by clicking within the row but not right on the name of the application, that is, don't double click on it. If you do, no big deal, you just need to go back to the previous step and try it again.
The ribbon should then become available.
- In the ribbon you should see a Permissions icon, click on the Permissions icon now.
- Within the Connection Permissions for Project Server Service Application dialog box, enter the name of the service account you will be using for this service, and then click on Add. You can go back and change this later if you need to.
- In the middle pane, ensure that the name of the service account that you just added is still highlighted, if not please highlight it now.
- From the bottom pane, select the Full Control checkbox then click on OK.
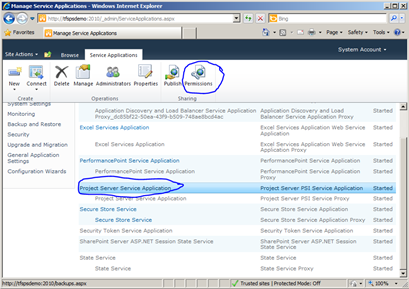
SharePoint central administration, Service Application permissions
-
Granting SQL Server database permissions:
Account(s): This is the service account for the web application pool for Project Server 2010 (you can find this by opening Application Pools in IIS Manager | Connections).
Since the following commands can take some time, there is also a handy PowerShell script you can use which is at the end of the Summary section.
We will grant permissions to PWA databases to the service account for the web application pool for Project Server 2010
To enable data synchronization, you need to grant permissions to the service account for the web application pool to update two SQL Server databases for each instance of PWA for Project Server 2010.
To grant permissions to a database for an instance of PWA:
- Log on to the data-tier server for Project Server.
- Select SQL Server Management Studio from Start | All Programs | Microsoft SQL Server 2008.
- The Connect to Server dialog box will now open.
- In the Server type list, select Database Engine.
- In Server name, type the name of the server that hosts the databases for Project Server, and then select Connect. (If SQL Server is installed on a cluster, type the name of the cluster, not the computer's name. If you have specified a named instance, type the server and instance name in the following format: DatabaseServer\InstanceName. If you have Project Server and SQL Server installed on the same machine, the localhost name that this dialog box defaults to will work fine.)
SQL Server Management Studio opens.
- Expand the Databases option, open the shortcut menu for the database for the instance of PWA (for example, PWA_Reporting), and then select Properties.
- Under the Select a page list, select Permissions.
- Add the service account of the web application pool for Project Server, and grant the required permissions. For example, the following permissions for the reporting database are required: Alter any Schema, Create Table, Delete, Execute, Insert, Select, and Update.
- On the publishing database (PWA_Published), grant the Select permission.
- Repeat steps 7 through 9 for each instance of PWA that will participate in data synchronization with Team Foundation Server.
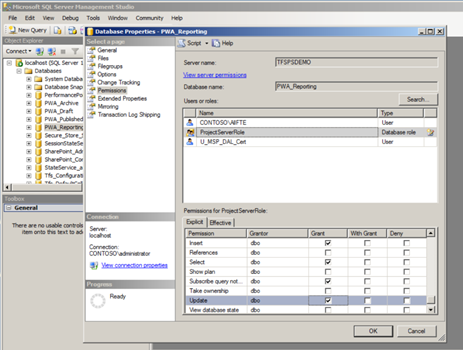
Database Properties, Permissions dialog box
-
Adding account(s) to the Team Members group of PWA:
Account(s): These are the Team Foundation Server team members who will submit status updates to Project Server from a client of Team Foundation.
- Open the PWA site.
- In the PWA SharePoint site, add team members to the Team Members group for the PWA, or you must grant them the following minimum set of project permissions, namely, Open Project and View Project Site.
-
Granting permissions to contribute to the team project in Team Foundation Server:
Account(s): These are the users of Project Professional who will publish plans to Team Foundation.
- Open the Team Foundation Server Administration Console from the Start Menu.
- In Team Foundation Server Administration Console, Grant View Project-level information permissions in Team Foundation, or assign them as members of the Reader group for the team project.
There's more...
Although we've covered most of the key parts already, there are a few other things you might want to consider. We'll cover those in the following section.
If some of the steps given here are not detailed enough for you, not to worry. We cover many of the same ones in the recipe, Permissions and Security.
About this Except:
Portions of this excerpt were re-published by the author (me). The full book is available for purchase here http://www.amazon.com/dp/1849688540/?tag=packtpubli-20. Note that some content may be different (pictures, charts, etc.) as I'm trying to format this post for the web.
 Subscribe